Abstract
For a plastic part or assembly to perform as expected, proper consideration must be given to material selection, part design, tooling, and processing using a holistic approach.
In a lot of instances, design errors are mistaken as tooling, processing and material issues. Design errors are even sometimes misclassified as customer abuse.
Introduction
Let us start with the basics.
What is a good design?
A good design should:
- Perform as intended over the projected life and intended environmental conditions
- Meet the appearance requirements
- Be as cost effective as possible. This applies not to just the assembly cost but the total cost which includes 1:
- The development cost
- The tooling cost
- Manufacturing cost (including yield)
- Qualification cost
- Repair and recall costs
Have no loss of any opportunity costs. These can be astronomical and may include:
- Market share loss due to the late introduction of a product
- Customers moving to other suppliers because of poor product performance
Have a rapid, efficient, smooth, dependable transition from the preliminary concept to mass production
Plastic vs. Metal
A quick look at the difference between the two types of materials is essential in order to appreciate the extra attention that plastic parts need.
Physical and Environmental Properties:
Two of the commonest alloys are AISI 1000 Series CR Steel with the yield strength of up to over 900 MPa and modulus of elasticity of over 200 GPa; and 6000 series aluminum with the yield strength of up to over 400 MPa and modulus of elasticity of over 70 GPa. Compare this with the corresponding properties of one of the most common engineering plastics, Polycarbonate at about 60 MPa and 2,400 MPa respectively.
Almost all plastics will melt and burn before they reach anywhere near the high end of the operating temperature ranges of any of the metals.
While you can take the metal data properties ‘to the bank’, the property data for the plastics is meant only as a guide and will vary tremendously depending on the design, processing conditions, environmental conditions, operating temperatures and rate of loading.
Latent Defects

Figure 1 – Defects in diecastings and stampings
from left to right X-Ray of porosity, visible porosity and crack in bent edge of stamping [1]
Parts produced from the most common metal processes (such as casting, diecasting and stamping) will carry almost no latent defects that cannot be detected with conventional QC tools. Even the porosity in diecastings can be non-destructively detected by X-Ray. See figure 1
Plastics on the other hand carry latent defects in the form of molded in stresses that are not measurable without very special equipment and/or costly destructive techniques.
For all the above reasons, it is very important for the designer to have a holistic approach to plastic product design.
Webster definition of holistic:
ho·lis·tic adjective \hō-ˈlis-tik\
: relating to or concerned with complete systems rather than with individual parts
In the case of plastic products, the “individual parts” are:
- Materials
- Design
- Tooling
- Processing
This can be akin to the four wheels of a high-performance car [1].

One bad wheel and….

As will be shown in the following, of all the four wheels, design is the most important and not given proper attention, may affect the performance of the other three.
Fortunately for the engineering community, there are relatively simple guidelines (empirical and data based) that, if followed, can make the design as robust as possible.
A powerful design analysis tool like DFMPro (more details at the end) can quickly analyze the solid model and point out most of the design deficiencies before the part goes for manufacturing. A good design is also the solid foundation that can be further optimized downstream using molding simulation tools.
Plastics and Long-Term Stress

Plastics, unlike metals, do not take long term stresses well.
These stresses can be the result of a continuous load, warpage (unwarping a warped part in the process of assembly, as an example), or many other design, material, processing, or tooling related issues. Therefore, any design, tooling or processing issues that induce avoidable long-term stresses should be eliminated.
Molded in Stresses in Injection Molded Parts
![]()
Figure 2
As we know, plastics are good insulators of heat. Figure 2 shows the typical thermal condition of the wall of a plastic part as it comes out of the mold. The outside layers are exposed to the relatively cold walls of the mold and the inside layers are insulated. Outside the mold the outer walls continue to cool faster than the inside layers. The outside stops shrinking while the hot inside is still cooling. This results in the outside walls being pulled in resulting in compressive stresses. The inside layers by the same token are pulled out resulting in tensile stresses.
Figure 3 illustrates this.
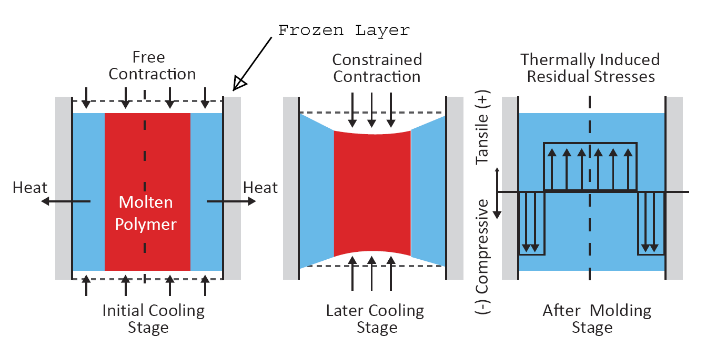
Figure 3 [1]2
The compressive stresses on the outside enable the part to be able to withstand higher tensile loads.
Additionally, they enhance the chemical resistance of the surface as the molecular chains are very tightly packed retarding the ingress of solvents.
A polycarbonate strip that may not fail on the application of acetone in the presence of the normal compressive stresses may have a catastrophic failure on the application of even a very small drop of acetone even if it is only slightly bent.
Figure 4 and 5 show a simulation of a polycarbonate strip to demonstrate this transition from compressive to a tensile layer. Figure 4 is the normal unbent strip. Blue indicates compressive stress and red tensile stress. Notice the compressive layer on the top layer in an unbent state. This turns into a compressive stress upon being bent – Figure 5.
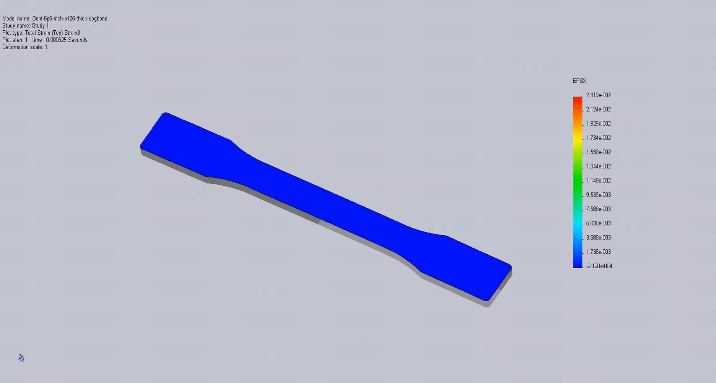
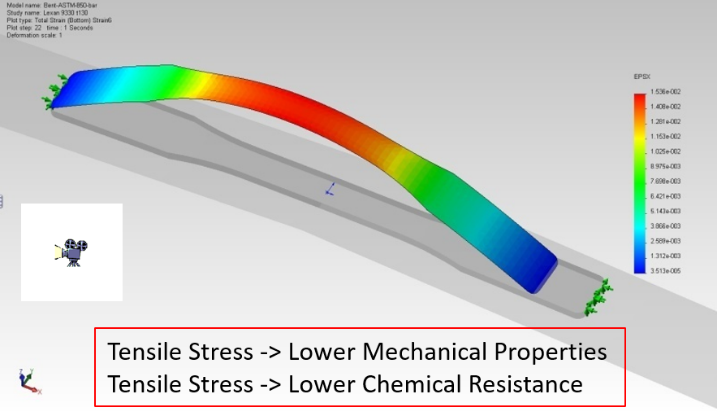
Figure 4 and 5 [1, 2]
Stresses Induced by Uneven Wall Thickness
Figure 6 is an infra-red measurement of the temperature of at ejection of a part with high wall thickness variation. The left side of the part is half as thin as the right side. The right continues to cool and shrink long after the left side has stopped. This causes a very high stress at the junction and serious warpage as shown in the lower view
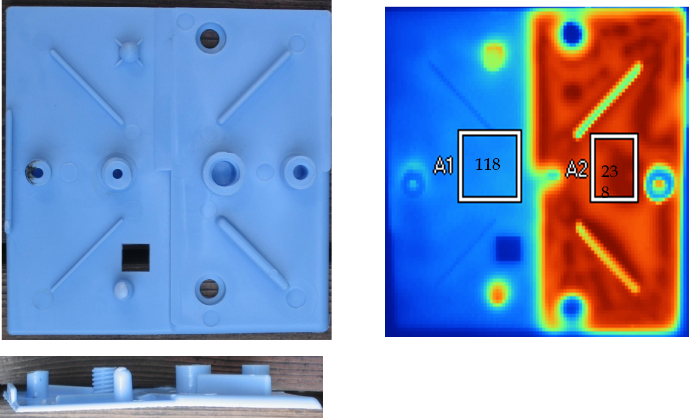
Figure 6 [1, 3]
Figure 7 shows the severe cracks in the side of a common hair blow dryer. Under the cracks is a very sharp transition of the wall for a lap joint (see below) along with a sharp internal corner (an additional stress riser as will be discussed later).
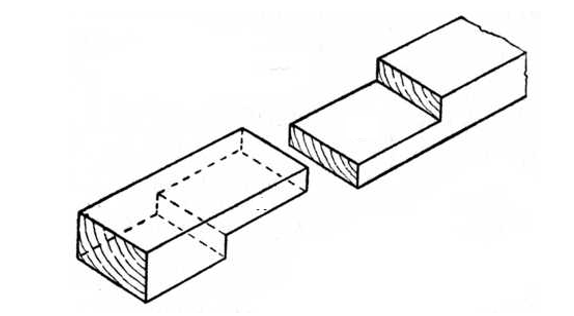
Even very mild chemicals like hair lotions on the hand of the user can cause these cracks.

Figure 7 [1]
Peeling the Onion
David Wright in his book “Failure of Plastics and Rubber Products” [4] has come up with the following percentage break-up of causes for plastic part failures:
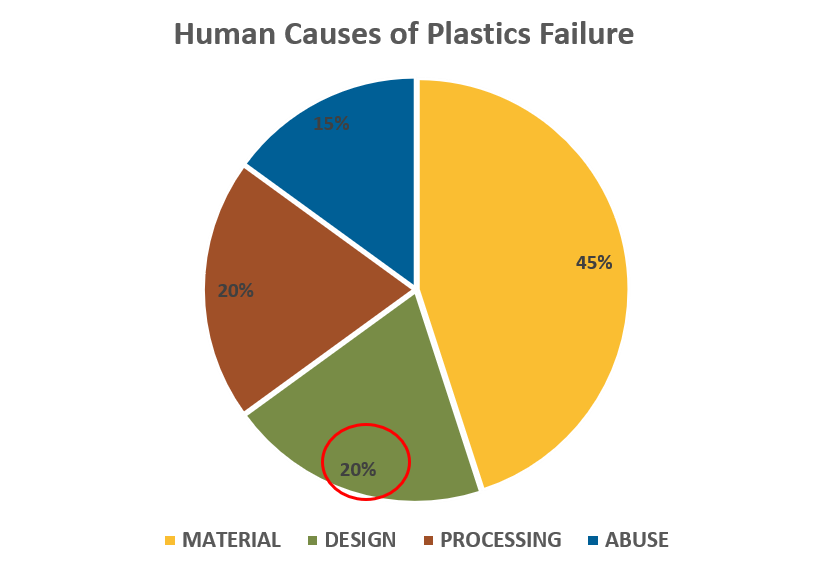
Figure 8 – Failure Cause Breakdown [1]
From the pie-chart in Figure 8, one can easily see that design issues account for 20% or more of the failures. What this chart may not show perhaps is the fact that design errors can also cause issues that manifest themselves as material, tooling or processing related issues.
To illustrate this, data from a review of design issues and effects based on some failed parts is shown in the following graph:
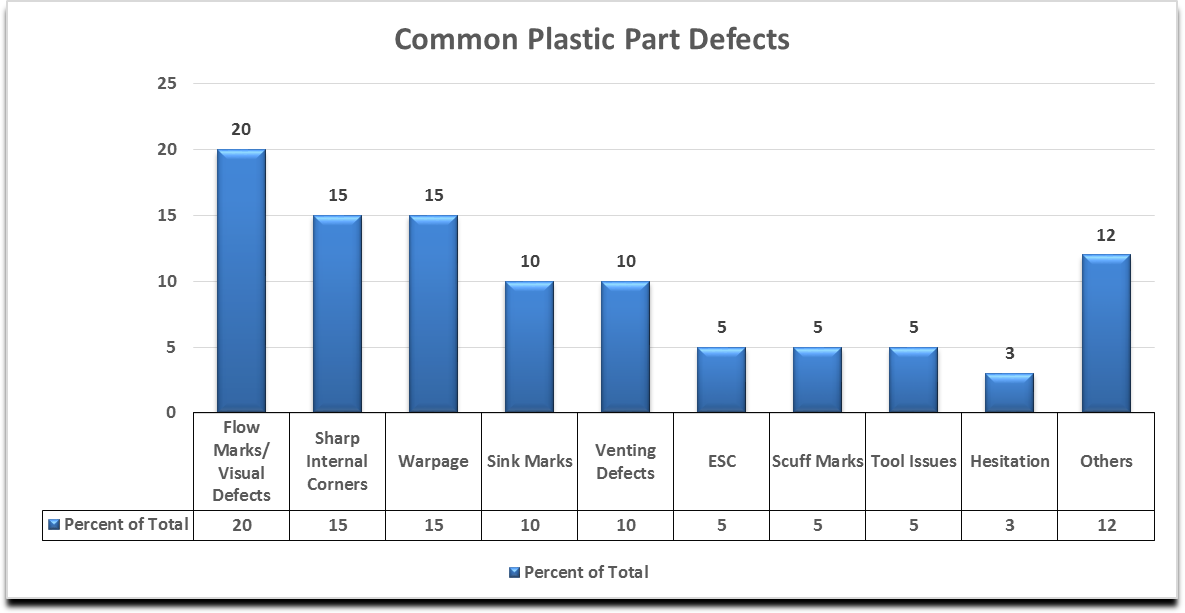
Chart 1. Common Plastic Parts Defects
With the following cause and effects (see Table 2 for cause and effect codes):
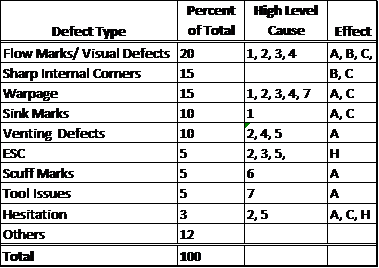
Table 1. Defect Cause and Effect
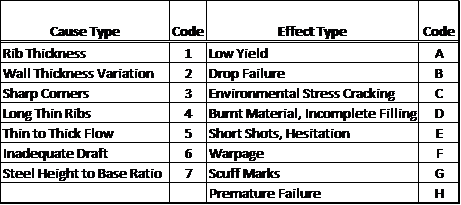
Table 2. Cause and Effect Codes for Table 1
Let us now look at some common defects using real examples with the main culprit for the failure – material, design, tooling, processing and possible abuse. A bold X denotes the primary cause and a faint X donates a possible secondary cause.
Visual and Flow Marks
Shadows, Sink Marks and Window Framing
Thick ribs cause a very heavy section at the intersection of the rib’s base and the adjoining wall resulting in a sink mark. No amount of processing will eliminate these blemishes.
This is often misclassified as a process issue (poor packing pressure).
Figure 9 shows a part with a highly visible sink mark.
Cause:
| Material | Design | Tooling | Processing | Abuse |
| X |
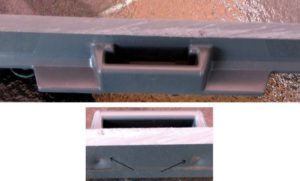
Figure 9 [1]
Figure 10 shows a part with a very faint sink mark also known as a shadow. This results from a rib somewhat thicker than the recommended thickness at the base. This was predicted in the design stage by DFMPro as seen on the right.
This is often misclassified as a process issue (poor packing pressure).
Cause:
| Material | Design | Tooling | Processing | Abuse |
| X |
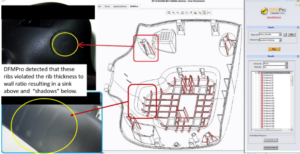
Figure 10 [1]
Window Framing
A thin rectangular area surrounded by thicker wall will cause differential shrinkage at the interface, causing a rectangular shadow to appear on the other side. Figure 11 is one such example.
Often attempted to be fixed by molding pressures and temperature.
Cause:
| Material | Design | Tooling | Processing | Abuse |
| X |
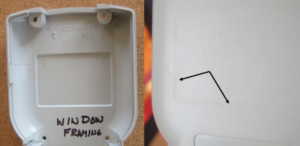
Figure 11 [1]
Difference in Gloss
Thick and thin adjacent walls with the same texture on the other side will cause uneven packing of these sections resulting in a finer reproduction of the texture in the section with the higher pressure and poor reproduction in the section with lighter packing. The latter will appear glossier than the former.
This is illustrated by Figure 12 which shows the same part packed under different pressure. The one on the right (lightly packed) appears glossier than the left with higher packing pressure.
Cause:
| Material | Design | Tooling | Processing | Abuse |
| X |

Figure 12 [1]
Dimensional and Functional Issues
Sharp Internal Corner
Figure 13 shows the effect of the inside corner radius (as a fraction of the adjoining wall T) on stress concentration at the corner (and consequent reduction of the load bearing capacity of the part). A radius of less than .5 T results in very high stress concentration.
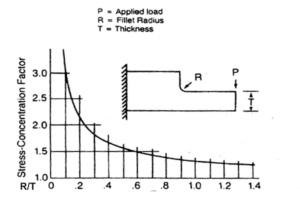
Figure 13 [1]
Mechanical Failure
Figure 14 shows a part that had a boss completely broken off in a mild impact. The cause was the very sharp internal corners at the junction to the wall.
This was misclassified as a material issue along with customer abuse.
Cause:
| Material | Design | Tooling | Processing | Abuse |
| X |
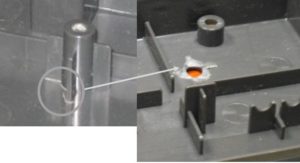
Figure 14
Chemical Failure
Sharp internal corners can also reduce the chemical resistance of the plastic due to very high induced stresses as discussed before.
Figure 16 shows a hand-held device with very sharp cracks.
The cause was even benign hand lotions on the users’ hands causing catastrophic cracks in the parts.
Again, the cause was falsely attributed to “poor chemical resistance” of the plastic.
Cause:
| Material | Design | Tooling | Processing | Abuse |
| X |
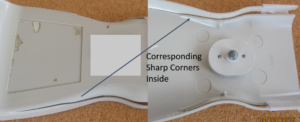
Figure 16 [1]
Warpage
Warpage may be caused by many design factors such as uneven wall, sharp internal corners, long bosses, poor draft, etc. In most cases the are blamed on tooling (poor cooling) and processing – cooling time, cooling, packing pressures, etc.
Figure 16 shows the part mentioned before with severe warpage due to the uneven shrinking at the interface of the thick and thin wall.
Obviously poor mold cooling due to tooling and processing issues can also cause this.
Cause:
| Material | Design | Tooling | Processing | Abuse |
| X | X | X |
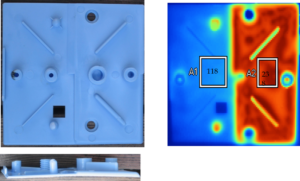
Figure 17 [1]
Hesitation
When a thin area is surrounded by a thick area, the thicker part fills first while the flow front in the thin area waits for its turn to be filled. By the time this happens, the plastic has already cooled substantially and had had a pressure drop. This results in “hesitation.” Hesitation may cause both visual defects and poorly filled parts.
Figure 17 shows the cross section of one such part.
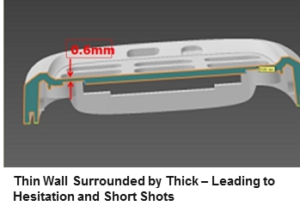
Figure 18 – Thick and Thin Sections Leading to Short Shots and Hesitation
Figure 19 shows an actual part. No amount of processing adjustments was able to fix the issue.
Cause:
| Material | Design | Tooling | Processing | Abuse |
| X |
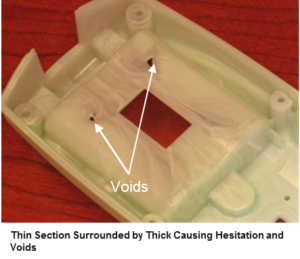
Figure 19. Thick and Thin Sections Leading to Short Shots and Hesitation – Actual Part [1]
Long Thin Cores
Deep recesses in a plastic part are created by long steel sections subject to being bent by the very high plastic pressure acting on it. There are guidelines on how long these cores can be based on the thickness at the base. Violation of the guidelines will result in the bending of the core resulting in dimensional issues and even tool failure.
Figure 19 shows a part that had a 1.5-inch core bend under the plastic pressure resulting in uneven wall thicknesses! This was quickly identified as a tooling failure and possible “stiffer” steels were investigated before fixing the core design issue. This may be remedied by the proper placement of gate through a flow simulation resulting in even flow on both sides of the core.
Cause:
| Material | Design | Tooling | Processing | Abuse |
| X | X |
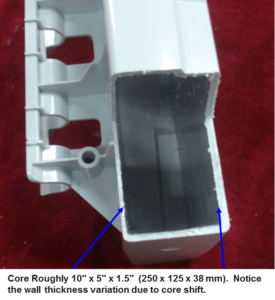
Figure 20. Core Shift Due to the Violation of Height to Base Ratio [1]
Draft
Plastic parts require a minimum draft for easy ejection of the part. A failure to provide a minimum draft angle will cause issues in ejection leading to scuff marks, warpage, longer cycle times and more.
Figure 20 shows a simplified view of the draft on a part. “a” is on the cavity side created by a hollow cavity; angle “b” is on the core side created by a solid steel core. As the plastic cools, surface “A” shrinks away from the steel and surface “B” shrinks onto the steel surface. Theoretically, surface “A” does not need a draft. However, if it does not, the draft on surface “B” would create an uneven wall with the top being much thicker than the bottom. As we discussed before, a uniform wall thickness is one of the most important requirements for a plastic part.
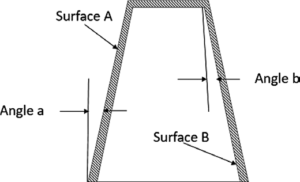
Quite often, this issue is misclassified as a tooling or processing issue, the real cause being poor design.
DFMPro to the Rescue
DFMPro, a CAD-integrated design for manufacturing software, helps design engineers identify and correct downstream issues early in the design stage, leading to reduction of cycle time and, in turn, also resulting in high-quality products with lower product development costs. [5]
How DFMPro Highlights Violations:
Based on standard best practices and configuration, DFMPro identifies and checks the parameters of each feature according to the selected checks and recommended configurations.
It not only zooms and highlights the feature that violates a DFM recommendation in the CAD environment, but also shows the actual and expected parameters information, so that the design engineer can clearly get an idea about the region to modify and the extent of change required. Refer to Figure 22.
For injection molding analysis, based on mold faces classification, DFMPro checks uniform wall thickness, recommended rib, boss and pin parameters, appropriate draft angles on core and cavity surfaces, undercuts, thin steel conditions on mold and many other criteria.
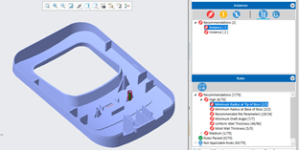
Figure 22. DFMPro Results/ Recommendation.
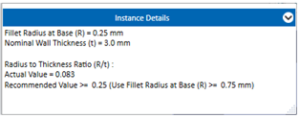
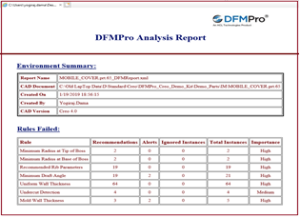
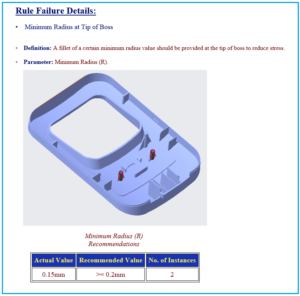
Figure 23. Violation Details in DFMPro Report
Design Time Reduced from 12 hours to 2!
A medical device company had been following strict NPI guidelines as per the FDA requirements. The review process was manual, driven by internally evolved best practices, guidelines and handbooks.
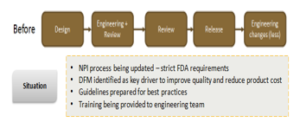
The key problem was a long and iterative design review cycle where the review process could consume up to 12 hours of effort. Since the process was manual, the design quality was a lot of times inconsistent. Additionally, in some cases, the organization was shifting from plastic to die-castings for which they did not have the required guidelines and design best practices.

To address this challenge, DFMPro provided an easy-to-deploy and easy-to-use solution. It packaged many of the internal guidelines as out-of-the-box rules in the software. The DFM validation checks could be evaluated right at the design stage thus saving iteration and review time. The company managed to reduce the review time to two hours without any significant process change with almost 70% reduction.
![]()
How the Tool Works:
It is integrated with leading CAD packages such as Creo Parametric, Siemens NX and SolidWorks and also available as a standalone application. The designs can be validated per global and organizational best practices right when the design is getting created.
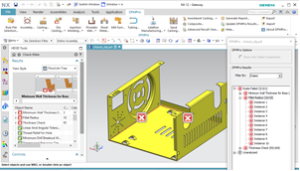
Figure 24. DFMPro Add-in for UG-NX

Figure 25. Geometric DFX –Standalone version
DFMPro software has commonly used in-built rules and configuration details.
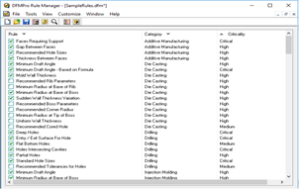
Figure 26. Pre-configured Design Best Practices
However, it has an extensible, flexible, scalable and open framework which can help build the rules as per organization standards.
The designer can get started with the software by directly using the pre-configured checks or use a customized version, configured by the subject matter experts in the organization.
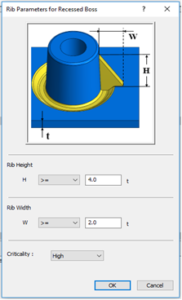
Figure 27. Configuration of the Design Parameters
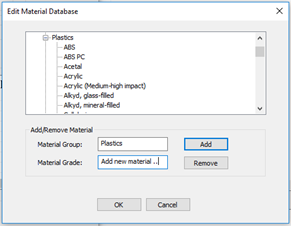
Figure 28. Material Configuration
Once the required checks, material and parameters are configured, analyzing the design is just a matter of a few clicks. The software automatically analyses the design identifying the features which may lead to downstream manufacturing and quality issues.
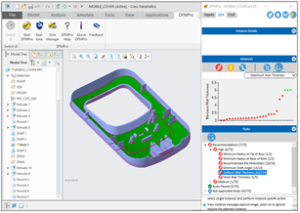
Figure 29. DFMPro Add-in for Creo Parametric
Any recommendations for design improvement which might show up are displayed right next to the CAD model and the relevant feature highlighted for easy reference.
Along with plastic moldings, sheet metal fabrications, die castings, machined components, and welding can also be analyzed. With newer versions of the software, additional rules are not only added into each supported process but new processes such as additive manufacturing, composites manufacturing, forging, thermoforming, are also supported.
Conclusion
The Quarterback
Is responsible for the outcome of each individual play and for the ultimate outcome of the game. Even the strongest offence and defense team members cannot make up for the deficiency in the initial play such as throwing an interception
The Designer
Controls the ultimate performance of her/his product. The rest of the members of his team – resin supplier, tool maker and molder cannot make up for the deficiencies in the design such as the knit line being at the position of impact.
Simple and avoidable errors by him/her not caught in time can potentially cause catastrophic revenue losses.
In the new competitive world, product designers are under tremendous pressure to produce robust designs at a minimum cost and in the fastest possible time. Engaging a powerful ally like DFMPro helps them reduce costly mistakes occurring due either due to human oversight or lack of manufacturing and performance knowledge. DFMPro can be analogous to using a spell checker in a word document which assists in detecting spelling mistakes in the document and fixing them.
1 Eye-opening Impact of Simple Design Errors – Vikram Bhargava, Plastics Engineering – October 2016
[Source]: EYE-OPENING IMPACT OF SIMPLE DESIGN ERRORS ON PRODUCT COSTS
2 Adapted from http://www.dc.engr.scu.edu/
References
- Robust Plastic Product Design: A Holistic Approach, Hanser Publications -Vikram Bhargava
- Photo credit: Joseph P. McFadden Sr.
- Photograph Courtesy of John Bozzelli, Owner Injection Molding Solutions, Home of Scientific Molding, Saginaw, Michigan
- Failure of Plastics and Rubber Products: Causes, Effects and Case Studies Involving Degradation, Smithers Rapra Press (January 1, 2001)
- [Source] : DFMPro