Wall Thickness Considerations in Plastic Parts
The third part of the series relates to the selection and importance of the proper wall thickness.
The main wall in a plastic part is referred to as the nominal wall and its careful selection is one of the most important requirements in the design of plastic parts. The nominal wall performs three basic functions:
- It serves as the conduit that takes the material from the gate to the extremities of the part
- It is a structural member of the total part and performs its own spatial, visual and structural requirements
- It is the platform to which other features such as ribs, bosses, snaps are attached
The best designed parts are the ones where the thickness of the wall is the thinnest required
- for flow to the extremities of the part
- to allow proper rib thickness and height
- to meet the UL Flammability specification
- to meet the structural integrity
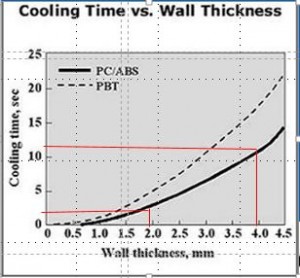 Before we go into the details of how we determine the thinnest wall thickness, let us take a moment to answer, “why the thinnest?” There are three reasons for this.
First the cost of the material. The thicker the wall, the heavier the part and the higher the cost. Simple.Second. The cost of processing. For smaller parts the molding cost can be much higher than the cost of the resin. The molding cost in turn depends on the cooling time. The cooling time is roughly proportional to the square of the wall thickness. In the chart to the left (courtesy Sabic) the cooling time goes from about 3 seconds at 2 mm wall thickness to about 12 seconds for a wall thickness of 4 mm. At $60/hour press rate, the processing cost may go up by about 18 cents!
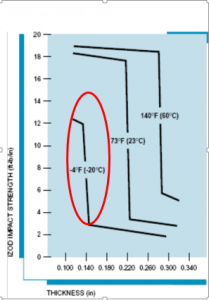 Third. Plastics need a good balance between the compressive layers on the top and bottom and the tensile layers in the middle. (see my last post, dated 15 Oct 2014) Too thick a part will cause the tensile layer to be disproportionately high – thus actually weakening the plastic. In the diagram to the left, the Izod impact strength falls dramatically when the thickness goes above .140 thick at -20 deg C.
Now back to the discussion on the optimum thickness of the nominal wall.
 1. Thickness required for flow:
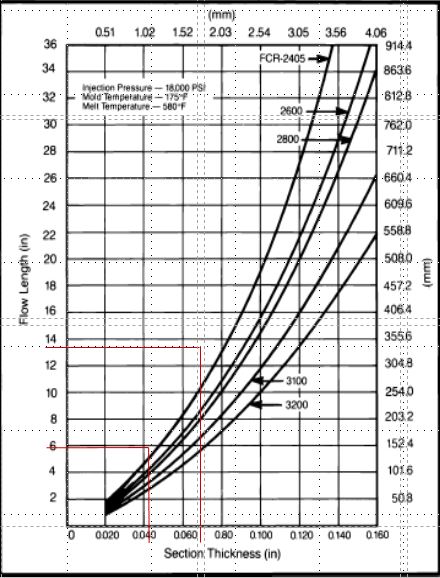
Plastics are highly viscous materials. At the recommended set of pressure, temperature and shear rate, they will flow for a given distance for a certain wall thickness (or the corresponding gap in the pieces of steel creating the wall). On the left is a typical flow length vs wall thickness for a few grades of PC/ABS (Courtesy Sabic). As highlighted, material 2800 will flow for about 10 inches for a .080 in wall and about 22 inches for .120 inch wall.
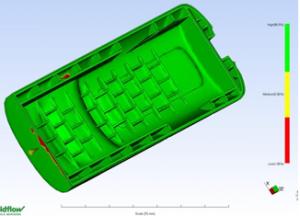 | The photo on the left shows how flow simulation (in this case, MoldFlowTM) can be used to check if the part will fill based on the gate location and wall thickness. (Green – high, yellow – medium and red -low confidence). |
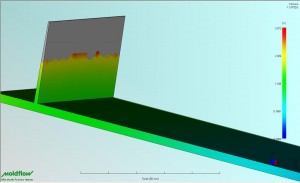 | In the case of the long thin rib on left side, the area in grey on the left represents a ‘no flow’ condition – meaning the art will not fill. |
2. Allow Adequate Thickness for Ribs
The next consideration is the minimum thickness for the properly proportioned ribs emerging from the wall. As will be explained in one of the following posts, to produce a cosmetically acceptable part and to minimize the molded in stresses in the parts the rib should not be more than 50-60% of the nominal wall thickness at its base (refer to the previous post, dated 15 Oct 2014) for the effect of continuous stress in a plastic part. The DFMPro software that I have mentioned before will automatically detect the violation of this condition.
 | Now consider the part on the left. (The draft is not shown for clarity). The main nominal wall is A. Rib B protrudes from it. B is also as the nominal wall to which rib C is attached. A needs to a minimum of about .120 so B can be .120*.6 = .072 and therefore C to be .072*.6 = .04 (about the minimum the material will flow). |
3. UL Requirements
The next item to be considered is the UL requirements in case the product needs to be UL certified for safety. As an example, UL60950 (Safety of Information Technology Equipment Including Electric Business Equipment) requires that the plastic for the fire enclosure around the circuitry be rated at least UL94 – V1. The rating requires a minimum thickness to meet the specification. The plastics are generally pre-certified by the resin suppliers. As an example, a very common grade of PC/ABS from Bayer, FR3100 TV has the following specification: UL 94 V1 at 1.5 mm thick. The minimum nominal wall thickness to meet the UL requirement would then be 1.5 mm.
4. Stress and Strain Requirements
Finally, the wall cross-section needs to be adequate to withstand the stress imposed by the forces acting on the various members of the wall.
Maximum Allowable Variation in Wall Thickness:
Before I leave the topic of the nominal wall design, let me talk about the maximum permissible wall thickness variations in plastics.
Obviously in the real world, it may not be always possible to have a wall that is constant in thickness throughout the part. It has been shown that a gradual change of 25% and 15% is acceptable in amorphous (PC, ABS, etc.) and semi crystalline (Nylons, PE, etc.) materials respectively.
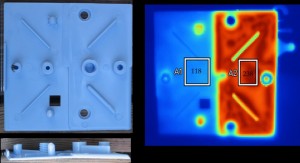
The photos below show what happens if there is a sudden wall change thickness. The left side is half the thickness of the right. Notice the temperature difference as the part comes out of the mold. The right section is at 238 deg C and the left is at 118 deg C. The right will continue to cool and shrink for a long time after the left is done cooling. This will create a tremendous stress at the interface of the two, thus leading to a possible premature failure. (IR thermal image courtesy of John Bozzelli).
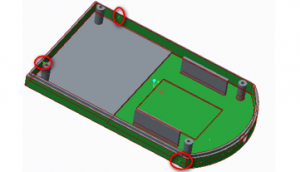
Below is an example of how DFMPro will highlight the issue of non-uniform wall thickness.
In the following posts I will discuss other plastic design violations such as sharp inside corners, rib thickness ratio, etc. and how DFMPro prevents us from knowingly or unknowingly making these design errors.
If you havn’t read my previous posts, you can read here Part I and Part II
